I did a mix of stippling the black and white prints... and quilting the coloured sections.
And used the magic binding technique using a scrappy peeper, with the Sketch as the binding portion. Looks like a really complicated piping treatment, but I can only be thankful that the Sketch hides a multitude of sins.
From the back.
I placed my label so that it would get sewn into the binding... and just needed to handstitch the three sides after it was completed. This ensures no little fingers could get caught in an unsewn loop.
Having quilting free areas means a bit of puffiness... sometimes this is good...
And sometimes not so good.
If I had more time I would have quilted more areas, and not had this problem. I thought about adding some feathered sections to the pink parts of the star - most of these sections sat flat with a bit of encouragement - but just ran out of time.
Now that this project is crossed off the list, I got back to sewing my Sew House Seven "The Tea House Top and Dress".
You can see from the line drawings that this pattern has seams through the front that give it shaping, and that the pocket sides are caught in this seam, as well as the side seam. There is a choice between side ties that are also sewn into this seam, or a back tunnel that captures a narrow tie, that can then be tied to the front.
I've got far enough through the process to be able to try it on... still need to finish some seams, and hem the bottom and the sleeves.
With this very drapy rayon the pockets just sort of hang in a somewhat depressed sort of way - interestingly each side hangs slightly differently. Rayon is actually one of the fabrics recommended on the pattern packet - but I accept that some rayons are more drapey than others, and I think this rayon is just a bit too much.
 |
| Not only does the top of the pocket drape down, but the fullness of the pocket drapes down over the bottom stitching lines. |
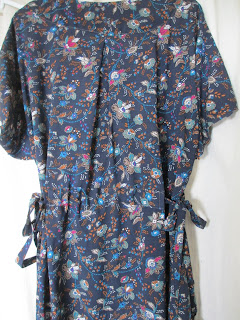
I never did quite get the back yoke to sit properly. To be honest I kinda hate the back of this dress - it is very smock like, in a 90yr old granny sort of way. My poor sewing skills have done it no favours.
I chose to alter the ties - I really dislike having wide ties that you do up at the back - I always find they sit right on a back bone and dig in. But I am also not a fan of ties that come around to the front. So, I narrowed the ties on the front...
And also added the ties to the back... so that I could tie it up at the sides.
Regardless of the shaping of the dress - it is actually the ties that give it any shape at all. The built in shaping from the seams creates fullness in areas where I don't seem to be all that full.
I think I bit off more than I could chew with this pattern - both with the design and the fabric choice. I'm not sure whether I will wear it if/when it gets finished, but I'm planning a slight hi/low hem line - and am omitting the cuffed sleeves - they will just get a narrow hem and we'll call it done.
Lesson's learnt - remember to look at the line drawing in detail before deciding to buy a pattern based on what the sample looks like. Also, do the fabric wrinkle test in the shop - and remember that even expensive rayon is not worth the angst.


3 comments:
Your medallion quilt is a cheery number, the addition of the piped/peeper binding is great. Perhaps simple SID on those blocks you are not happy with will be enough to anchor the block down. Your label's are lovely, very professional looking.It's a shame the dress gave you so many headaches as that alone can lessen the appeal to want to wear it. Wishing you a Cherry Merry Christmas.
Sewing clothing is a hit and miss effort sometimes. When I used to sew all my clothing for work...many years ago...I would come up with a dud every now and then. So very frustrating but I would just give it away.The fabric looks so pretty...darn! The medallion quilt is great!
I really like your new decorative designs! it's so beautiful so much and good idea on site.
หนังสยองขวัญ
Post a Comment