Showing posts with label Log cabin stars. Show all posts

Monday, May 30, 2016

Behind the Scenes

Another week of chipping away at things.  Unfortunately an hours progress on FM quilting does not lead to any dramatic photos!  Quilting the background area of a quilt with large "negative space" is rather daunting.  I started in the middle and have somewhat worked my way outwards... going around the stars.  I've even gotten to the outside edge of some areas.  So it was a real good feeling to spread my quilt out and inspect exactly how much was left of what can feel like an endless project.  Instead of doing actual sewing, I spent my sewing day cutting the pieces for my next VQR sampler block.  I am feeling really positive about things.

So in lieu of exciting progress photos... we have a new quilt on the bed!


This is an extremely large quilt... check out that overhang on a queen size mattress.


The fabrics are cheap and cheery Spotlight fat quarters... the colours loosely chosen from several large prints.  So greens, aquas, pinks, oranges just all flow together.  This quilt pattern was in a book about Three Colour Quilts (upsized and log cabins blocks adjusted to be irregular) - the stars one colour, the log cabins another, plus the background the third colour.  I approached it from a slightly different perspective, where the colour areas covered "all" colours, not just one colour.


What do I love most about this quilt?  Probably the soft, washed look of it - almost like a beach house style.  Comfortable, vintage... love it.

Tuesday, November 20, 2012

A bit of random this and that

It was a quiet weekend on the quilting front.  Dylan had been invited to a friends birthday activities, and we decided to give the birthday boy a quilt of Dylan's that he was no longer enamored with.  I'm not really sure whether this is the done thing or not - but it was freshly washed, and in the spirit of recycling - and my hope that it could be loved by another small body, we wrapped it up and hoped for the best.  It seemed to be accepted by both the child and the mother, so hopefully all was OK.  What is your opinion?

Anyway, before it got wrapped up, I thought I had best take some photos for posterity - as this was finished well before I got into this blogging business.  This quilt started when my kids were allowed to choose one fat quarter at various quilting shops as a way of sneaking a bit more browsing time for me... after all, they had to choose the best fat quarter.  It could take quite some time.  I did manage to purchase an awful lot of fabric in that time! 

As time went on, it appeared that Dylan's choices all had a bit of a repeating theme - although they struggled to fit into a particular pattern, design or colour combination.  This just goes to show - you can make a quilt out of anything!

Courthouse steps blocks with a few random plain squares to highlight the fabrics


Quilting on the log cabins - a wiggly spiralling line through the logs forming the spine for a "big bump/little bump" echo back to the beginning.  Easier to do than to explain!

The feature fabrics had a regular spiral quilted as the spine, then the same echo.

The backing - a cheap and cheery NZ print - kiwi, tuatara, pukekos etc

The centre of the log cabins featured fussy cut farm machinery at work, cut from a panel


While I was at it, I also took a few photos of the Log Cabin Stars quilt that has resided on the bed all year so far, and I still love.


And Nadia has been busy with the stitching kit she won at The Country Yard.  She chose her embroidery threads herself - pink, purple and royal blue... and is practicing her back stitch.  I marked dots to indicate the position of the stitches and she's doing a great job.  Luckily there are not too many letters!


Other than that - I've been hand sewing the binding on the Bulls Eye Quilt and it is looking grand.  I've also completed another couple of circles on the Denyse Schmidt circle quilt... so only two more circles to go and it will be ready to sash... progress!!

Wednesday, January 11, 2012

I've been a bit distracted...

...as we have had Nana come to visit last week, so although the BIG ONE got finished after she left, not a lot of other stuff got done. 

This was all I could fit in the camera screen... need to do a good outdoor shoot but also need it to stop raining!


Closeup of a less than perfect feather...


The last couple of days have been spent sewing and finishing a little dress for my midget.
One happy chappie
Oh to be 6 and get away with these sort of combinations.
She is very happy, and it is actually a pattern I would sew again!  Wow, how often do you say that??  In fact, who remembers me swearing off any form of sewing that wasn't quilt making??  Should I confess that I have fabric for a pair of pull on pants (what a weird explanation - don't you pull on all pants?) and two tops...?  The fabrics are to die for, so I just have to make them - hopefully before summer finishes.  So a few details, I purchased and downloaded the pattern from Printsew.com - not without it's hitches but all worked out in the end, Simplicity 2377 View C.

After a circle-less week, I have been playing with these babies again... OK, so I need to do more... yes, I have some awaiting the glue stage... they will get added as time goes on - but COOL aye?


I also have pulled out the instructions for Block Three of Gail Pan's Bluebirds and Berries BOM.  Making progress!
A little crooked, still heaps more to do... and I notice I've chopped the last bit off the bottom which is a vine block - although it is just an empty background rectangle at the moment, which probably explains why it got chopped off in the first place.
I've also been keeping an eye on numerous quilt alongs... oh, so tempting... and I've even bought a pattern for one... dang it... and downloaded instructions (although as Nadia would say "constructions" as in "Mummy, do you have the constructions for that?") for another... how on earth did that happen??  How many more weeks of school holidays are there - am I losing my mind??

But sometimes I just have to admit to karma (or whatever it is) - when something happens, and you go, I have fabric that would look great in this... and it's a pattern I really like... and... and... and so I think I'm going to join the "I'm a ginger monkey" Swoon quiltalong (would that be a Swoonalong??) - using these FabricWorm fabrics I got last year.

Do you like them all lined up?
Or a bit more random?  This was two fat quarter bundles that caught my fancy and I thought might work together in some way - or is that swoonway??.
Must be the day of double questionmarks!!  Edited to add I'm linking up with Lee at Freshly Pieced... check out what everyone else has been up to.

Sunday, January 8, 2012

I've knocked the bastard off...

Thanks for the quote Sir Edmund Hilary - which he made upon conquering Mount Everest.  No mountain climbing for me, but I have finished... I repeat FINISHED quilting... and binding my huge 105x90" Log Cabin Stars Quilt. 

Just to jog your memories...
This was actually a pre-finished photo - quilt is currently in the washing machine.
So many firsts with this one:
 * first time using feathers on an actual quilt... and jumbo size ones at that
 * first quilt so BIG... while many of my quilts are on the large side, this is certainly the biggest so far (note to self - remember to make them smaller in future!)
 * first time successfully doing machine applied binding!  Woot!!

I didn't do the machine applied binding quite the way Ms Lottie had taught us... as I'm not a good student and didn't want to pin right the way around the quilt - I'm not greatn at pinning accurately, plus I'm not the greatest at ironing evenly, let alone stitching accurately.

My solution:
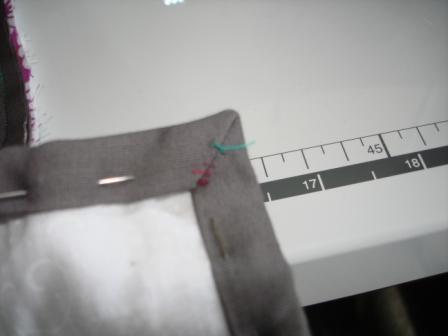
Firstly, I cut my binding 2 1/2" just like normal, folded in half, and applied to the back of the quilt and followed the usual instructions, doing the little fold one way, then fold the other way at the corners to make the mitred bit.  I also used a 1/4" seam using my normal 1/4" foot (which is how I do my binding anyway - never had any trouble).

Sorry this photo is a bit dark and blurry - but then I turned the binding to the front aligning it slightly over the stitching line, and pinned just two pins in each corner, before playing around with the actual corner mitre until I was happy with it, then used a needle and thread to put about four stitches through the corner to hold in place.  Did this for all four corners and is something I would recommend for anyone doing any kind of method of machine binding.
 
Starting on a long straight edge, I wrapped the binding towards the front - again using the stitching line as the guide so that the edge of the binding just covered it, then using my normal old 1/4" foot, lined up the left hand side of my foot (which has a 1/8th inch width from the edge to the needle) with the original fold in the binding (the left hand side of the binding in the picture).  Keep going to the corner mitre, needle down in the corner and pivot.  Keep on going!  Make sure that binding is pulled out to the right firmly before you fold it over.  If I was doing something smaller, I probably would iron first from the wrong side of the quilt pressing the binding out, to give the back a neater seam line.

Gives a top stitched effect on the front...
 
Corners on front are pretty good... although not perfect


Corner on back OK, and a topstitch finish on this side also.

Nothing beats a hand finished quilt... but I do agree that there is a time and place for machine applied binding - now that I've found a method that suits me, I will definately be doing it again.


I've also been playing with names for this quilt... and am thinking
"What the F.... feathers"
might just be the winner.

Saturday, November 26, 2011

Call Me CRAZY!

Decision made.  Execution still required.


OK - so I always sort of saw feathers on this quilt.  But the thought of all that work on a quilt made of cheap and nasty-ish Spotlight fabrics put me off.  Plus the size of the quilt wasn't exactly a positive.  Surprisingly, after a bit of a play on EQ6 with a feather garland - I worked out that doing an almost circular design around the star, with feathers extending into the nooks and crannies of the log cabin blocks was maybe achieveable.  Trick was to make it all big enough that the scale of the feather suited the scale of the block.

So off I went... with a hiss and a roar.  It is definitely a bit rough.  If you look at it from a great distance with your eyes sort of slitty... it looks T-errific!  I've now done three of the stars, and have now remembered that if you quilt at a slower pace than flat out, well, you can actually echo around things pretty good.  I am sure that by the time I've finished, I will have either worked the whole feather thing out of my system - or I'll be an expert.  We shall wait and see...


This is the prototype - Feather Number One.  Shows promise.

Monday, November 21, 2011

Another Weekend... another BOM Start

My Tweets - Block One
November has started off cracking with new projects.  Whoops - did I decide at some point in time that I should be concentrating on WIP's??  The less said about that the better.  I had a lot of fun visiting new blogs as comments were left on mine as part of Freshly Pieced WIP Wednesday link a couple of weeks ago.  I also found a new project, with Erin Russek's "My Tweets" programme through whatahootquilts.blogspot.com who run a Monday BOM's Away link up thingee.  While My Tweets has been running all year, I've just downloaded month 11, and have just got block one together - with blanket stitch still to do.  It's very different from the original (which I also love) - but by using the Japanese Taupe fabrics I already need for the Bluebirds/Berries BOM - I can at least feel like I'm getting two for the price of one... and it's very soft and pretty.
Did I really not put a white strip inbetween the first two cabins?

I finally finished putting together the pieced back for my log cabin stars quilt.  Whew - what a mission.  Firstly it is huge (90x105), secondly I ran out of scraps/left overs of white on white... and was unwilling to cut into my stash (well, I might need it!)  But I did... and after a quiet afternoon of sewing, had the back finished.  A few more afternoons and it was sandwiched, and now I am making great progress with the quilting.
The log cabins will have the interlocking boxes...

and the friendship stars have loopy flowers - some are more square
than others.
I am still undecided about what to do in the large white areas.  With the quilt being so big I don't really want to do an all over design - but the white areas really need something significant to hold it all together.  Any ideas??  Please let me know!

Just incase you need a memory refresher? I know it's been
a while!

Tuesday, August 16, 2011

The Back continues

After my small break from the Log cabin stars quilt back over the weekend, I have returned once more... with a bit more progress.  Improv piecing takes such a long time!  Which is really weird because you don't really measure anything, and it's not all that important where different fabrics get placed... which is the bit that usually takes ages - but there you go, it is a slow way of doing things.  I have completed enough blocks with colour inserts, just need to build up the white rounds to make them something like the same size.


I am going to keep the fabric on the right hand side in one long run, then have the pieced squares separating a narrower strip of the pink daisy fabric (on the LH side below) to make up my 90" width. 


Even though I bought both of these fabrics to use as the backing for the quilt (the pink one is on the front of the quilt too), I wasn't really sure how they would meld together to form the backing - after all, they don't really go together - and I did wonder about this in the shop before I bought them... but got them anyway.  If there had been enough of the fabric on the RH side to just do a single fabric back, I would have - but fate meant that there was only so much.  Bring on the creative flair - well, I might still be waiting for that to turn up, but progress all the same.

Sunday, August 7, 2011

Log Cabin Stars To Be Continued...

I know what my problem is.  I haven't really got "into the groove" as far as my crafting goes.  In the house we rented, I had a great big room all to myself.  I didn't have to share it and it didn't matter how messy it was.  I just gravitated towards whatever part of each project appealed to me at the time, and left yesterdays unfinished project wherever it lay - which was usually on the ground.  I no longer has this extravagance.

I have also realised that as far as my keeping the kitchen bench clear goes - the trick is to empty the dishwasher before you need it.  That way, when you do want to clear the bench, it just disappears in a few minutes. I don't need to be religious about doing this at night before going to bed, I can do it just as easily in the morning - as long as the dishwasher is empty.

I think in a deep and meaningful way these two points are closely related and that I need to analyse my needs and how my brain works, and work out a system to make things - craft things - flow better.

So, anyway, on to bigger and better things... sewing.  Woohoo, finally got something, hmm, well was going to write done, but in reality it is not finished, more a work in progress - but this is going to get done, and nothing is going to get started in the meantime.  This shall be finished!

The Design Wall - first thing this morning

All my left over bits from the Log Cabin Stars quilt
 
Putting all those pieces to good use - what do you know, a pieced
backing is starting to take shape!

A close up of one of the blocks - just a improv log cabin
but very satisfying.
So I have almost used up all my little bits and now just need to work out how it is all going to go together.  I have two different fabrics that I bought to go on the back of this quilt - although they don't really go together, so hopefully the pieced section will help to tie them in as one cohesive unit.  I have found the process of using these left over bits slightly disturbing.  I have also realised a truth about the method of how I quilt and why my stash is so random.  In reality, my real stash (ie the one that I use) is the left over bits from other quilts.  The things I buy to add to "the stash in my drawer" are pieces that are rarely used.  Isn't that weird?  So if I use the left over bits on my quilt back - what am I going to use for those little bits and pieces that I regularly go through my scraps for?  I think this is going to need some sort of deep analysis also.

And I just thought I'd post a picture of a little quilt (16" square at the moment) which is a sample of the practice blocks I have been doing with my teachers group - now that we've included the technique of fusible applique.  I had already decided that the practice units we created would be put together for newborn bassinette quilts at our local maternity hospital - so this is something like how they will turn out.  We will also practice our quilting skills when we get to that stage.  So if there happens to be a midwife who works at the local maternity hospital (come on - you know who you are) perhaps you could comment on exactly how big this quilt need to grow to be a good size?


My brain is starting to smoke - time for a break...