Saturday, November 26, 2011

Call Me CRAZY!

Decision made.  Execution still required.


OK - so I always sort of saw feathers on this quilt.  But the thought of all that work on a quilt made of cheap and nasty-ish Spotlight fabrics put me off.  Plus the size of the quilt wasn't exactly a positive.  Surprisingly, after a bit of a play on EQ6 with a feather garland - I worked out that doing an almost circular design around the star, with feathers extending into the nooks and crannies of the log cabin blocks was maybe achieveable.  Trick was to make it all big enough that the scale of the feather suited the scale of the block.

So off I went... with a hiss and a roar.  It is definitely a bit rough.  If you look at it from a great distance with your eyes sort of slitty... it looks T-errific!  I've now done three of the stars, and have now remembered that if you quilt at a slower pace than flat out, well, you can actually echo around things pretty good.  I am sure that by the time I've finished, I will have either worked the whole feather thing out of my system - or I'll be an expert.  We shall wait and see...


This is the prototype - Feather Number One.  Shows promise.

Monday, November 21, 2011

Another Weekend... another BOM Start

My Tweets - Block One
November has started off cracking with new projects.  Whoops - did I decide at some point in time that I should be concentrating on WIP's??  The less said about that the better.  I had a lot of fun visiting new blogs as comments were left on mine as part of Freshly Pieced WIP Wednesday link a couple of weeks ago.  I also found a new project, with Erin Russek's "My Tweets" programme through whatahootquilts.blogspot.com who run a Monday BOM's Away link up thingee.  While My Tweets has been running all year, I've just downloaded month 11, and have just got block one together - with blanket stitch still to do.  It's very different from the original (which I also love) - but by using the Japanese Taupe fabrics I already need for the Bluebirds/Berries BOM - I can at least feel like I'm getting two for the price of one... and it's very soft and pretty.
Did I really not put a white strip inbetween the first two cabins?

I finally finished putting together the pieced back for my log cabin stars quilt.  Whew - what a mission.  Firstly it is huge (90x105), secondly I ran out of scraps/left overs of white on white... and was unwilling to cut into my stash (well, I might need it!)  But I did... and after a quiet afternoon of sewing, had the back finished.  A few more afternoons and it was sandwiched, and now I am making great progress with the quilting.
The log cabins will have the interlocking boxes...

and the friendship stars have loopy flowers - some are more square
than others.
I am still undecided about what to do in the large white areas.  With the quilt being so big I don't really want to do an all over design - but the white areas really need something significant to hold it all together.  Any ideas??  Please let me know!

Just incase you need a memory refresher? I know it's been
a while!

Sunday, November 13, 2011

Another Block of the Month Finish

This weekend has so far been spent finalising my colourway, and producing Block One of a brand new BOM by Kristin MacDonald over at KMAC Quilts (check my side bar and one day I will learn to insert links).  After a bit of harassing friendly encouragement from me, she has agreed to make her patterns available... as they come... so maybe not a true BOM, or rather a "Block of the When I Get It Finished" programme.  So block one is available to download if you are interested.  Her inspiration has been both Baltimore Album quilts as well as The Day of the Dead festival... an interesting combination and will see some of her designs having skulls and things amongst the foliage.  Not being much of a skull person... I am going to go with the flow and see what happens.

It took me a while to decide on a colour scheme, as Kristin is into her solids, and
I thought I may go the same way as a homage to her design, but I don't know, those
prints just kept wanting to join the party... result... actually none of the fabrics are
solid.


Now I must confess that my block is not 100% accurate to the pattern - firstly due to one of my flowers/stems being placed wrong awkwardly so that the top of the stem showed, instead of being hidden under the flower.  Solution, add another circle under the inner circle to cover it up.  Once I'd done that, it sort of made sense to follow it through to the centre of the block... which I then did.  All in all, very happy.  Now, I wonder what has happened to Block Two?

Monday, November 7, 2011

Progress on this and that... plus what happened to all those little bits??

I enjoy reading my own writing too much to have a wordless post... so I will bore you with all the little details of my minor accomplishments over the past few days.  I'm also linking up with Lee at Freshly Pieced for her Wednesday WIP thingee.  My entire blog is 99% work in progress - it would be brief if it was only finished projects (snort, snort).

Firstly, with the guild's Xmas lunch pending, the need to make a handmade gift for the santa exchange had been hovering over my head.  Over the weekend I played with a little grab bag of leftover fabrics from "my local" (the lovely ladies at The Country Yard) containing fabrics covered with quilting related words. 


Now I can't reveal all at this stage, however... a small, sneak peak.


I have also started piecing the sashing strips on a charm square quilt.  I'm starting to get the hang of these solid fabrics... and they are definately growing on me.

OK these are really just pieced straight, but don't they look
so much more interesting on an angle?
My Sew Happy Me stitch along is progressing nicely... still behind but who's counting??


And just incase you were wondering about the freezer paper templates I gave you a little tutorial on cutting a few posts ago... well they've blossomed into a wee block.

Freezer paper ironed onto the reverse of the chosen fabrics waiting
for the seam allowances to be glued down.
Little bird still needs a black bit on his eye, and whole thing
needs to be invisible machine stitched down.
After a bit of a vague email, those same lovely ladies from The Country Yard sent me a package containing my favourite thread for everything "Seralene" by Mettler in a mid grey.  I think it is meant to be used as a bobbin fill - but I use it for just about everything.  And also a little selection of Japanese Taupe fat quarters to add to my rapidly diminishing pile of scraps which will ultimately end up pieces in Gail Pan's Bluebirds and Berries BOM quilt.  Don't you love it when they wrap them up to look like presents?

Sunday, November 6, 2011

When Good Quilts Go Bad

Have you ever just lost interest in a quilt.  Like entirely??  I find that after making a good start on my indigo quilt... it just doesn't do it for me any more.  I keep thinking I should pull it out and do some more - but I feel no compulsion to even look at it, let alone sew it. 
Remember this one?

This is the first quilt that I have ever felt like this about.  I feel so guilty.  I mean, there are other quilts that get put away for one reason or another, but I have every intention to finish them at some distant point in time.  This quilt I just can't be bothered with.  It's so frustrating, I still like the quilt pattern, I think it is kinda cool... so what is it?

But on a positive note - I may be able to use the fabrics (along with some others) to make something completely different!


On a different note, oh to be 6 again when the comment "you're looking colourful today" is taken as a compliment.  Visualise bright red lace look leggings, multicoloured autumnal coloured sun dress with pink jacket and pink socks.  Delightful!

Wednesday, November 2, 2011

Cutting templates

The thing I love about doing applique with fusible web is the pretty much instant effect - trace, iron, cut, place on background, do you like it? Yes - iron - done (well, apart from the blanket stitch or whatever).  You know what it looks like early on and can tweak fabrics and placement before committing to that final iron.  You do need to work out right from the beginning which pieces are going to be unders, and which are overs - to ensure that your fusible will be properly attached to those pieces that will underlap another piece.

Other techniques have their positive and negative points.  And sometimes it's fun to experiment with another technique.  I decided to do My Whimsical Quilt Garden pattern using a machine applique technique, where you cut all the templates first from freezer paper.  So a bit of prep work required before you even really start looking at fabrics.  This is why this project has sat in a drawer for months on end - I just needed to get the next block prepped.  And it's not even really that bad... a bit of a Nike moment - Just Do It!

The way that I transfer my pattern onto my freezer paper is that I don't.  I start with a photocopy of the pattern layout and a piece of freezer paper big enough to fit behind the design (do you need your template reversed or the same as the original - with freezer paper having different sides, I need to use it with the shiny side down).  If you are doing several blocks using the same design - easy - layer your freezer paper upto 6 layers deep.  Next using a stapler put a staple into each design shape - put a few in on bigger areas or long skinny ones that might shift as you cut.  If you can't reach into the centre of the design with your stapler - leave those ones until you have cut some of the outer pieces away, and then staple the internal ones.

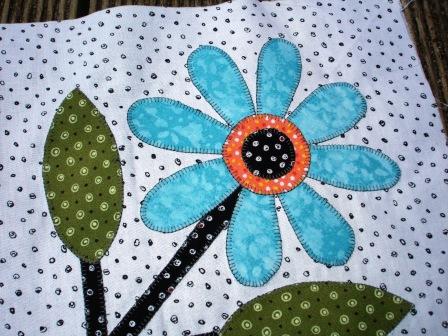
Staples added - couldn't reach the centre of the flower or the upper
part of the stem, so came back and stapled those later.
Then start cutting around the shapes.  The idea is to cut directly on the line as accurately as possible as this is going to be the final template shape.  NO TRACING!!  Where there is a shape completely inside another shape (as in the circle in the middle of a flower) cut through the outer shape in one direct line, then cut around the internal shape.  Because I'm going to be ironing the shapes onto the back of my fabric pieces, the iron will hold the cut line back into place.  You end up with every shape cut out individually stapled to the original copy.  Leave them like that until you are ready to do something to them (such as when I iron them to my fabric) so that you don't lose track of what they are - and if you did multiple copies make sure that you number the copy as you remove each staple otherwise you will end up in a terrible mess.

Showing the cuts to allow access to the internal shapes


Can you use this transferring technique for other things other than freezer paper machine applique?  I don't see why not, although to date I haven't tried anything.  I think it would be good for transferring images to cardboard templates where you can't see through them and they don't really run through printers very well.  Also for some of the weird things you end up having to make with/for your kids (I'm thinking arts and crafts projects here).  I'm sure there are other applications too.