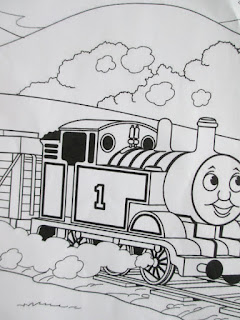
I often look at colouring books, and imagine the outlines filled with fabric, as opposed to felt pens. The idea of blowing up a A4 page into a block size, or indeed a quilt size has always appealed, and didn't seem too difficult to achieve. Well, now that the project is finished, I was kind of right and wrong, both at the same time.
I started with an image off the internet... which had no copyright.
Scanned the printed page to get a PDF, then printed it using the Tiling function in the print properties, choosing to print 7 pages across, by 7 pages down. That's 49 sheets of paper in total, which needed to be trimmed and taped into place.
The resulting pattern sort of took up most of the lounge, so was soon banished to the sleepout floor.
I originally tried to buy a large sheet of clear plastic/vinyl to trace the pattern onto, but of course, when I wanted to buy it - couldn't find it for sale anywhere. A cheap clear shower curtain did the trick, although it wasn't perfect. It had folds and wrinkles that did cause problems, and it was somewhat stretchy, which also caused problems. But soldier on I did... tracing the pattern, simplifying the design somewhat in the process.
I used the plastic sheet for two reasons, once the major outlines had been traced on, I flipped the plastic to use the reverse side to trace my fusible web pieces. Then once the fabric pieces were fused and cut, I used the plastic back in its correct position over the background fabric to help place the pieces.
It was cumbersome and fiddley... and not all that enjoyable. I was surprised how much fabric I needed to buy to get this project finished. Partly that was because I needed quite large pieces of fabric - and they all needed to work perfectly together - so not really an ideal project for random stash usage. I also needed to use several different types of fusible, as they don't make the wide fusible web that I used to prefer, and the narrower width that is available now wasn't large enough for the pieces I wanted to cut. Some of the other products were difficult to use, and tended to resist being ironed to the backing fabrics. This just added to my frustration levels. It was thick and uncomfortable to machine blanket stitch around - pieces tended to fall off part way through the process.
But as you can see, the picture did finally get finished. The addition of the borders and the name applique turned the picture block into a decent single bed size, and the wonderful border fabrics used helped to finish the whole project off. Great choice Kerryn!
So would I do it again? Not sure. I have had another idea for a large applique quilt that has been floating around in my head for ages - but I'm just not sure now whether I could face it after creating this "masterpiece". Maybe it is a bit like child birth, and I just need to wait for the pain memories to fade.


3 comments:
Awesome! mmmm child birth, those memories never really fade 100% do they!
Child birth! It wasn't that bad, was it!? Thomas is very cute, painful or not!
That turned out so well despite your painful journey and I'm sure William loves it.
Post a Comment